#1 Trusted, Reliable, Local Roofer
GUTTER INSTALLATION
Providing Reliable & Trusted Residential & Commercial New Roof, Roof Installation & Roof Repairs.
We have expert roofers with over 25 years of experience.We are licensed and insured
GET YOUR FREE QUOTE TODAY!!
Master the Process to Install and Replace Gutters with Ease
Ensure your gutters are strong and sleek by learning how to install them.

Introduction to Gutter Replacement
Improve the strength and look of standard gutters by modifying them. The roof flashing keeps water flowing into the gutters by minimizing joints, assembling strong, sleek seams, and adding flashing.
Tools Required for Replacing Gutters
- DEWALT 20V MAX XR Cordless Drill
- NUN 54-22 CORDLESS 6-TON CABLE CRIMPER AND CUTTER
- Crescent Wiss 9 ¾-Inch Metal Master Tin Snips
- Louisville Ladder FE3224 Fiberglass Extension Ladder
- C-RHEX® Cleanable, Reversible Magnetic Hex Head Driver
- Malco MD10 duckbill tin snips
- Astro Pneumatic Tool PR14 Air Riveter Gun
Materials Required
- 1 1/4″ self-tapping hex head screws
- 1/4″ hex head zipper screws
- 1/8-in. medium length rivets
- Gutters
- Elbows
- Downspouts
- Gutter flashing
- Hanging strap
- Gutter sealant
Project Planning for Rain Gutter Replacement
Guttering designed for easy installation is available in almost all home centers and hardware stores. You can also use these same parts to build rain gutters and downspouts that are stronger and more attractive with just a little more work
Gutter Replacement Project Evaluation and Planning
Compared to professionally installed gutters, DIY gutter replacement can save you a lot of money, but there are a few pitfalls to avoid. Check the fascia and soffit for signs of rotted wood (Fig. B, below), which should be replaced before you install new rain gutters. There are many houses that have crown molding or trim boards nailed to the fascia just below the shingles. For gutters to be flush with the ground, you’ll need to remove this fascia board, as we did, or add a continuous strip of wood underneath it. Before hanging gutters, prime and paint all the bare wood.
Make sure your rain gutters are ice-proof and learn how to install them.
Make a Sketch of Your House and Measure It Before Installing Rain Gutters
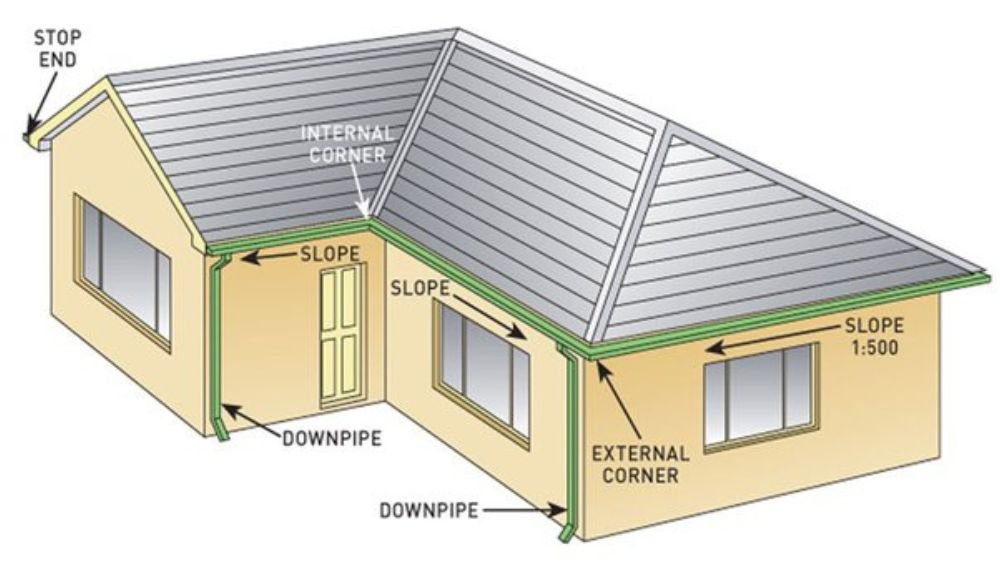
The image below shows an example of a rain gutter system for a typical house (Fig. A). Measure the length of the rain gutter runs and mark the downspout locations. You can then count up the inside and outside corners as well as the end caps, making note of whether they are right ends or left ends. The length away from the house at the bottom of the downspouts should be four feet longer than the height of the downspouts.
The number of elbows required for each downspout is three. You can find two types of elbows on downspouts; one turns to the front, and the other turns to the side. Sometimes you may need a side elbow, usually to turn a downspout extension sideways, but most installations require only front elbows. Here are a few planning tips:
- Make sure downspouts are positioned in areas where water can be directed away from the house without obstruction. Whenever possible, avoid areas with obstacles such as electric meters, hose bibs, and sidewalks.
- It is best to place downspouts in unnoticeable locations.
- Whenever you live in an area that experiences torrential rains or large roof areas, install downspouts that are oversized 3×4 inches.
- Long gutters (40 feet or longer) should be sloped down both directions from the middle, with downspouts placed at either end.
- When your house does not have fascia boards or if your fascias are not vertical, you’ll need special mounting straps for roof hangers.
Mounting Details and Parts for Gutters
Calculate the length of your horizontal rain gutters and downspouts and determine the parts you’ll need.
Pi Fire Solo Stove Review: Pizza Oven Transformed From Your Fire Pit
Gutter Uses You Probably Didn’t Know About
Protect your foundation from overflows with rain barrel diverters
Sign Up For Our Newsletter
Sign up for our newsletter to learn how to complete DIY projects like a pro!
20 Step-by-Step Instructions for the Project
Step 1 Making Gutter Cuts
- Working on a ladder is much harder than joining sections from the ground.
- Lap all seams from two to four inches instead of butting parts together and covering the joints with a seam cover as directed by the manufacturer.
- Tin snips should be used to cut the front and back sides.
- Make a bend in the gutter and cut the bottom.


Step 2 Make a Notch in the Gutter
- With tin snips, cut a notch two inches long in the front lip of the rain gutter to join it to an inside corner or outside corner piece.
Pro-tip: Make a four-inch-long notch for overlapping and joining gutter sections.
Step 3 Sections Should be Snapped Together
- Place a bead of gutter sealant along the corner of the gutter 1-1/2 inches from the edge.
- Cover the notched section of the gutter by hooking the front lip of the corner over it and snapping it into place.


Step 4 Attach the Sections with Rivets
- Install six rivets shown at the indicated locations on the gutter to secure it to the corner.
- The first rivet will be installed with the rivet gun after drilling a 1/8-in hole in the front of the gutter (for 1/8-in rivets).
- Drill the remaining holes and install the rivets evenly spaced across the length of the gutter.
Step 5 Seal The Seam with Caulk
- Use gutter sealant to caulk the seam on the inside of the rain gutter.
- Apply a small amount of sealant to each rivet.

Step 6 Gutters Should be Preassembled Before Installation
- Joining a gutter section to a corner has been illustrated.
- You can use the same method to join two sections of gutter, but make sure the sections are overlapped by at least four inches when you assemble them.
- While splicing and joining gutter sections, make sure to keep the factory-cut end on the inside if possible.
- Ensure that the inside section of your rain gutters faces downhill in order to prevent water from running out the seams.
- In places where gutters end, extend them about an inch beyond the fascia board to catch water from overhanging shingles.
- After attaching the end cap with rivets, seal the joint with gutter sealant from the inside.
Step 7 Place a Mark at The Outlet of The Downspout
- Measuring from the corner of the house to the center of the downspout location is the first step.
- Verify that obstructions are not present.
- This measurement should be transferred to the gutter and a downspout outlet should be cut in.
- Pro-tip: While this method takes a few minutes longer than using one of the shorter gutter sections with a preinstalled outlet, it eliminates using two seams and it’s a much cleaner option.
- The center of the downspout outlet should be marked on the gutter’s bottom.
- By centering the outlet over the mark, trace around its inside, flange side down.
- Using an old chisel, cut a V-shaped notch to serve as a starting hole for the tin snips.
- When you are chiseling the notch, place two short scraps of 2 x 4 under the gutter to provide support.


Step 8 Prepare The Outlet Hole by Cutting It!
- Use Offset tin snips to cut out the outlet hole.
- Pro-tip: Cut counterclockwise with red tin snips. Using green snips, cut in a clockwise direction. There is no difference between the two.
- Make a 1/16-inch cut outside the line.
Step 9 To Secure the Outlet, Insert a Rivet Into The Hole
- Predrill 1/8-inch holes for the rivets and slide the outlet into the hole.
- Run a bead of gutter sealant around the opening after removing the outlet.
- Press the outlet into the caulked opening and install the rivets.

Step 10 There’s Nothing You Need More Than a Little Slope
- Downspouts determine how fast your gutters empty based on their number and size.
- In addition to reducing corrosion, sloping them helps avoid standing water that can leak through the seams.
- You should slope a house water channel running about 1/4-inch toward the downspout for every 10 feet of gutter.
- As long as your fascia boards are level, you can slope the gutters according to them.
- A level can be used to verify this by holding it against the bottom edge.
- Make sure they are level by adjusting the string line until a level aligned with them shows a slight slope.
- The gutter top should be indicated by a chalk line.
- Straighten gutter sections by aligning the top edge with the chalk line as you screw them to the fascia.
Step 11 Make a Mark On The Gutter Slope
- Set the proper slope during gutter installation by driving a nail 1/2-inch below the shingles on the high side of the water channel.
- Calculate the distance between the fascia board bottom and this nail by measuring and recording the distance.
- To determine the lowest point of the gutter run, subtract 1/4-in from this measurement for every 10 feet of gutter.
- You should drive a nail at this mark and stretch a chalk line in between them.
- The slope can be checked by aligning a level with the string. There should be an off-center bubble toward the high side of the bubble.
- Pro-tip: Make sure you have the correct slope by adjusting the string until the bubble appears.
- In the end, snap the string to mark a line on the fascia board.


Step 12 Install The Gutter on The Fascia By Screwing It In
- Using stainless steel 1-1/4 in hex head sheet metal screws, drive them into the fascia through the back of the gutter.
- You need to install a screw every two feet.
Step 13 Add Flashing to The Gutters
- If you replace your gutters, install metal gutter apron flashing beneath the shingles and over the back edge of the gutter to prevent water from running behind your gutters.
- You can have a local sheet metal fabricator or aluminum siding contractor bend some flashing if you cannot find it pre-bent at your local home center or hardware store.
- Under normal conditions, you should slide the flashing under the shingles and the roofing paper or ice and water barrier.
- Pro-tip: You can also slip the flashing under the shingles if the ice and water barrier is stuck to the sheathing or there are too many nails and staples along the edge of the roofing paper.
- Pro-tip: You may need to slip an additional strip of sheet metal flashing under the bent flashing and over the gutters if the flashing is too short to reach the gutters.
- Make sure gutter flashing is tucked under the shingles and secured with 1-1/4-inch roofing nails each 2 feet.
- You should wrap gutter sections about 2 inches wide.


Step 14 Straps for Hanging Gutters on Hooks
- Once the gutters are screwed to the fascia, it is a simple matter to install the hidden gutter hangers.
- Support the gutters and strengthen the front edge by installing hangers every two feet.
- Gutter hangers are designed to fit over the back edge. Since we have flashing covering this edge, simply hold them level and screw them through the flashing and gutter and into the fascia.
- Pro-tip: In order to avoid the hangers from slipping over the back edge of the gutter, you should install the gutter apron.
- We had a little difficulty getting started with the large screws included with the hangers, especially through the gutters and flashings that were made of steel.
- When the screw tip bites into the metal, rotate them at high speed without applying pressure.
- Drill them into the fascia while leaning firmly on the drill.
Step 15 Connect The Elbows to The Downspout
- Standard downspouts are 2×3 inches, but you can do the same for oversized ones 3×4 inches.
- Ensure that the elbows and downspout tube are assembled with their crimped ends facing down in order to prevent water leaks.
- You can disassemble the downspouts to clean them if necessary by using sheet metal screws rather than rivets.
- Pro-tip: Pre-painted 1/4-in hex head screws with sharp points, called zippers, are preferred by professionals because they are easy to install. It is easiest to obtain these screws from a gutter supplier, but we found them in the aluminum siding section of a home center.
- To connect the downspout outlet to the elbow, screw an elbow in.
- Measure the distance between two elbows held against the wall.
- Make sure each end has a 1-1/2-inch overlap.
- You will need a hacksaw to cut this length off downspout tubes that have not been crimped.
- Professionals use circular saws with carbide blades with 24-tooth teeth for cutting downspout tubing, but you can also use 32-tooth hacksaw blades.
Pro-tip: Power miter boxes are also great for cutting gutters and downspouts. Using an old blade will do the trick. Don’t let flying metal bits hurt you by wearing protective goggles, leather gloves, jeans, and long-sleeved shirts.


Step 16 Use a Crimper to Crease One End of the Downspout
- Utilize a special sheet metal crimper to crease the downspout’s short end length.
- With the three blades on the inside of the tube, hold the crimper against the inside corner of the tube and squeeze.
- While the three blades of the crimper are attached to the inside corner of the tube, tighten the crimper by pressing against the inside corner of the tube.
- Each long edge should be crimped three times and each narrow edge should be crimped twice.
- Two ¼-inch hex head sheet metal screws should be used to connect this short section of downspout to the elbow joints.
Step 17 Brackets Should Be Fastened to The Wall
- In order to fit the pieces together, the length of gutters and elbows are crimped, or squeezed, at one end, one inside the other.
- As 10-ft lengths of downspouts are only crimped on one end, you’ll have to crimp one end of any cutoff piece to make it fit inside the next elbow or downspout section.
- In order for any cut-off piece to fit inside the next elbow or downspout, you must crimp one end of the 10-foot downspout length.
- Pro-tip: Installing one or two downspouts does not require crimping, you can twist them in place using needle-nose pliers. The good news is that you can save a great deal of time and frustration with an inexpensive crimping tool.
- A crimper for sheet metal is needed to crimp one end of the short length of the downspout.
- The three blades of the crimper are attached to the inside corner of the tube. Tighten the crimper by pressing against the inside corner of the tube.
- You should crimp each long edge three times and each crimp each narrow edge twice as standard procedure.
- Using two 1/4-inch hex head sheet metal screws into each joint, attach this short section of downspout to both elbows.


Step 18 Brackets Should Be Attached to The Downspout
- Assemble the downspouts and attach them to the wall after completing the gutter installation.
- Pro-tip: Create U-shaped brackets out of sections of a downspout if you cannot find them. Compared to the bands that wrap around the outside, these look better and are easier to install.
- Incorporate screws into the assembled downspout by driving them through the brackets.
- For water to be directed away from the foundation, attach a length of downspout tube to the bottom elbow.
Step 19 It’s Vital to Give Proper Maintenance to Your Gutters After We Install Them If You Want Them to Last for a Long Time
- Several companies specialize in gutter cleaning and maintenance, so ensure yours is kept clean two times a year by cleaning the leaves from the gutters.
- By installing gutter guards, you’ll extend the life of your gutters and prevent problems like backed-up gutters and clogged downspouts.


Step 20 Buying Rain Gutters Guide
- In home centers, lumberyards, and full-service hardware stores, metal gutters, downspouts, and accessories are available in ten-foot lengths.
- The standard gutter colors for most homes are white and brown.
- Homes with earth-toned finishes complement brown tones like Royal Brown and Tuxedo Gray.
- The most popular color choices homeowners prefer for gutters today are cream and eggshell.
- A wide variety of downspout elbows and accessories are also available, as well as matching inside and outside corners.
- Seal the seams of your gutters with special gutter sealant.
- There are small toothpaste-type tubes and 10-oz caulk gun tubes available in most stores.
- Our seamless gutter installation technique shows how you can install them yourself using the same basic methods.
- A seamless gutter company will visit your home, measure and form continuous lengths of aluminum gutter to fit, and explain all the installation accessories you need.
- The cost may be a bit higher, but you can choose from dozens of colors and you won’t have seams in your gutters.
- You’ll also be able to drag the VW Amarok home without having to measure, shop, and haul the parts home.